
With Trail Connect, whatever the path, as long as you've got the track... So whatever your question, as long as you find your answer in our FAQ !

When you are looking for a track, the 20 last tracks created will appeared. If you want to see more tracks, file on the bottom of the screen until the 20th, and when you are on the map mode, slide on the right. The tracks will then be charged 20 by 20.
You can see the total number of the tracks which appeared which correspond to the total number of your search thanks to the numbers at the top left of your track.
A/B/... C :
- A = number of track which appeared
- B = number of the tracks charged on the screen
- C = total number which correspond to your search in the data base
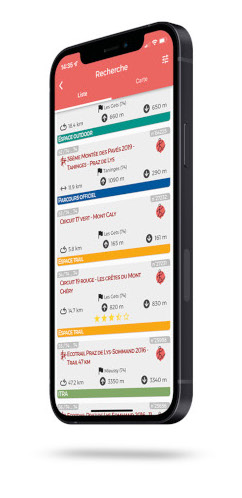
On Trail Connect, few routes are classified like "labels" in order to facilitate your search :
- ITRA : competitions routes approved by ITRA (International Trail Running Association).
- Official routes : official routes of the competition, created by the organisers.
- Espaces Trail : tracks which has been worked with the local territorial collectivity in order to propose you verified and marked paths for trail.
- Espaces Outdoor : tracks which has been worked with the local territorial collectivity in order to propose you verified and marked paths for outdoor sport (hiking, cycling, snowshoeing...).
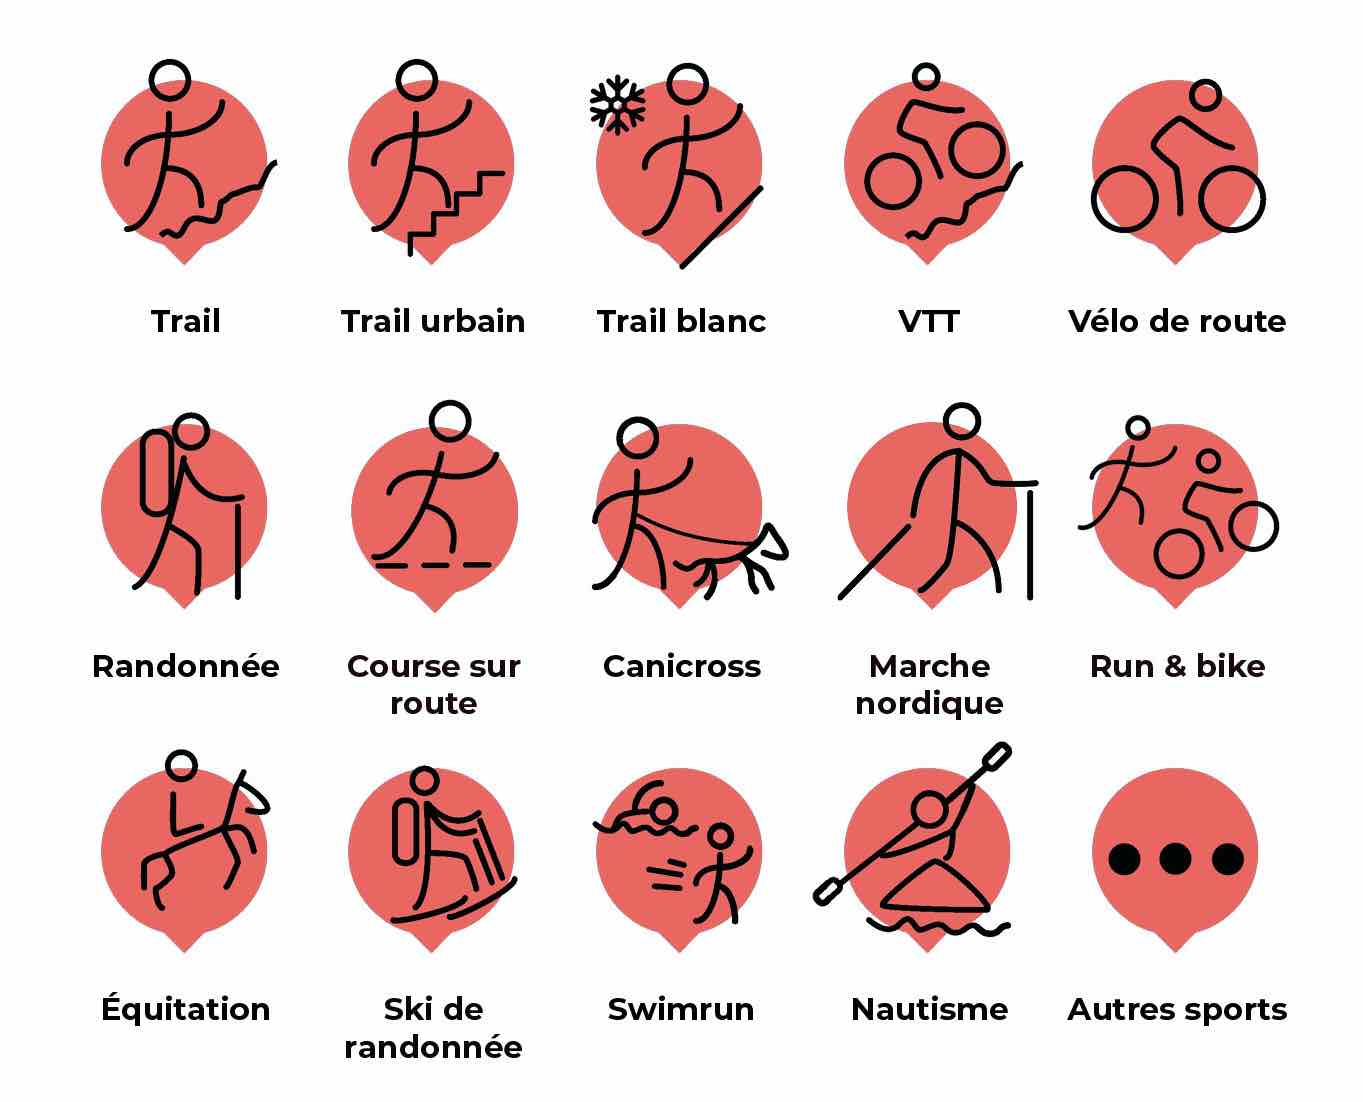
On Trail Connect, you can find all the routes present in Trace de Trail, but also many routes linked to other outdoor sports : hiking, mountain bike, cycling, sailing, nordic walk, road running, riding...
You can filtrer your search by noting which activities you want to practice !

When you are looking for a track in the "map" mode, the tracks will appeared with pictograms of different colors. To show the complete route, slide your screen on the right until the one you want to add to the map. Then, click on "add to the map" : the route is now on the map. You can add as many routes as you want.
If you want to remove a route from the map, select the wanted route on the map, then click on "remove from the map".
When you've found a track and that you've put it in your favorites, you can find it in the module "search for a track". Click first on the filters on the top right and select in the category "search through" the filter "my favorites tracks". Don't forget to validate on the bottom right. The favorite tracks which appeared are the one you decided to put in your favorites n Trail Connect.
You have also the possibility in this same category to click on "my last tracks seen". The last tracks you have seen in Trail Connect will appeared, even if you didn't add it to your favorites tracks.
If you found a track which pleased you and you want to keep it, you can add it to your favorites.
When you are on a track, click on infos, then on tools, and click on the star add to favorites.
Among the data available in the track description, the indice of quality of track enables you to have indication on the viability and practicability of the route. It will show you the average distance between two points. This indice is considered like :
- good when there is at least 1 point each 20 meters
- medium between 25 and 50 meters
- bad beyond
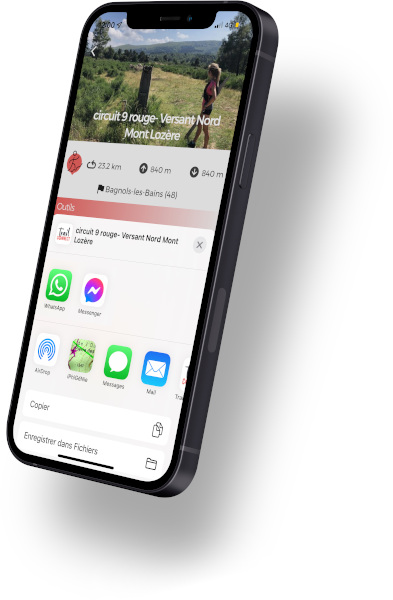
When you find a track, go to the information part, on the bottom right. In the tools, you can export the GPX file. You can after do many things :
- To send the GPX file to an app compatible with your GPS watch (ex: Garmin, Polar, Suunto...)
- To send the GPX file by mail, message or WhatsApp to share it with other people
- To save the GPX file in the files on your mobile phone to get it easier later
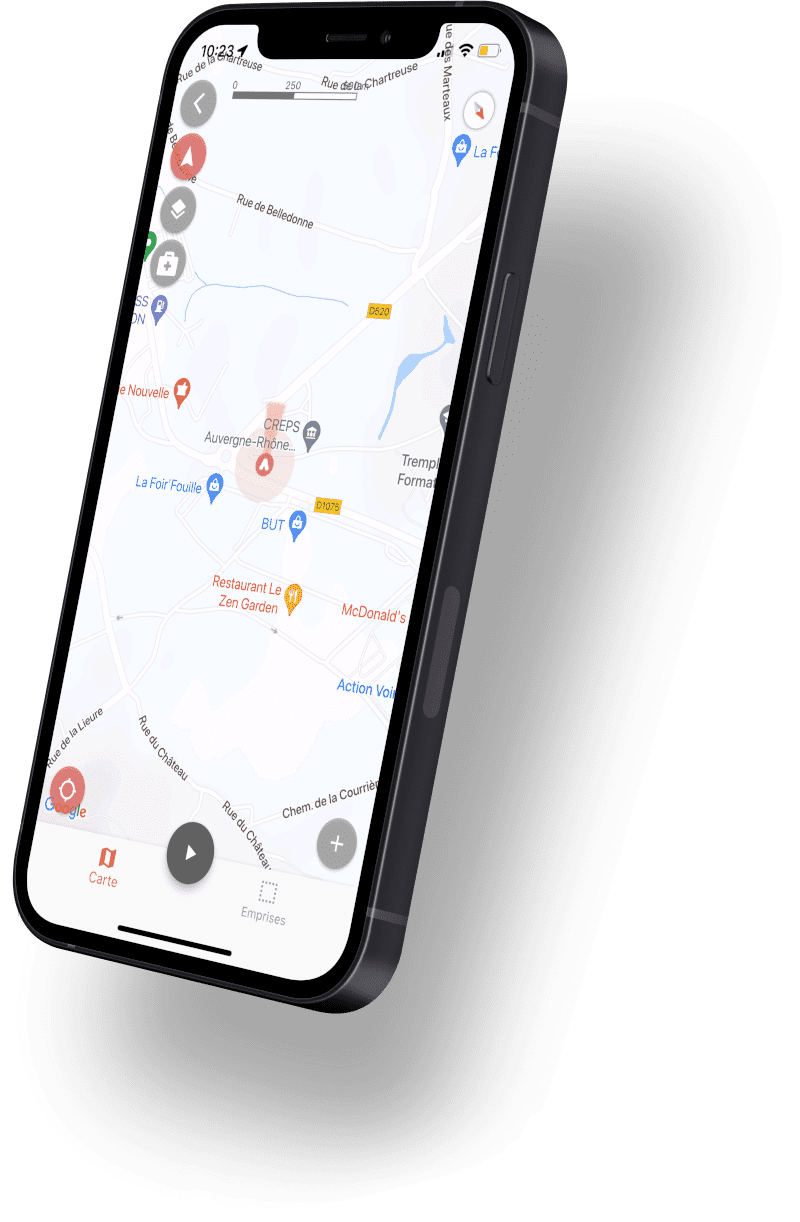
When you geolocate yourself on a layer, a position marker indicates the place where you are. A button with a target appeared at the bottom left of your screen :
- Target button selected in red (by default) : your position marker is always in the middle of the layer, even when you're moving. You can't navigate on the layer.
- Target button non selected in grey : your position marker appeared as well, but not imperatively in the middle of your screen. This possibility has to been used when you want to navigate freely on the layer.
So, select or not this button depending on your needs !
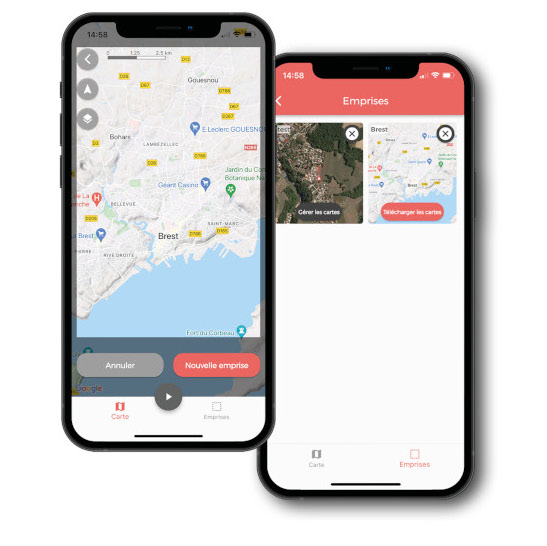
With Trail Connect, you have the possibility to get in your mobile phone the tracks and/or the layers of your choice to have access at any time, included without network connexion. It's called place your track in cache. So, if you are going on a place where the network connexion is not covered by your operator, think about this functionality before.
How to do ?
Place your track in cache : on the page of the track of your choice, in infos, then tools, click on caching track. Select the layer of your choice as well as the zoom level. More your zoom level will be big, more your layer will be precise.
Once your track is caching, you can find it in downloaded tracks on home screen.
Place your layers in cache : if you don't know exactly which paths you're going to take but your want to get the layers of a specific geographic area :
- go to the maps on home screen
- create an extent which correspond to the sector you want to get on your mobile phone by clicking on the +
- once your extend is created, go to the map and extents part, and click on download maps
The place your track in cache functionality enable you to download the track of your route as well as the layers, in order to use it without network connexion (see last question). It's important to do it before your start to anticipate the absence of network connexion.
An extent is a functionality of Trail Connect which enable you to download the layers of a chosen place, without a link with a track (which makes a difference with the functionality "place your track in cache"). It enables you to get access to the layer of a selected zone during your activity, even if you don't have network connexion.
It's important to chose well the scale of your extent depending on the use you need : more the area will be limited, less the layers will take time to download.
It is possible to save the maps of a specific geographic zone. You just have to create an extent. To do so :
- Go to the "map" mode from the home screen
- You can then locate yourself thanks to the second button on the top left, or just find a place by surfing on the map
- Click on the "+" button on the bottom right when you chose your zone
- Click on "new extent"
- Name your extent
- You can then find your extent in the "extent" on the bottom right
Once your extent is created, you have to downloaded the maps of this extent, by clicking directly on the button of that particular extent "download the maps".
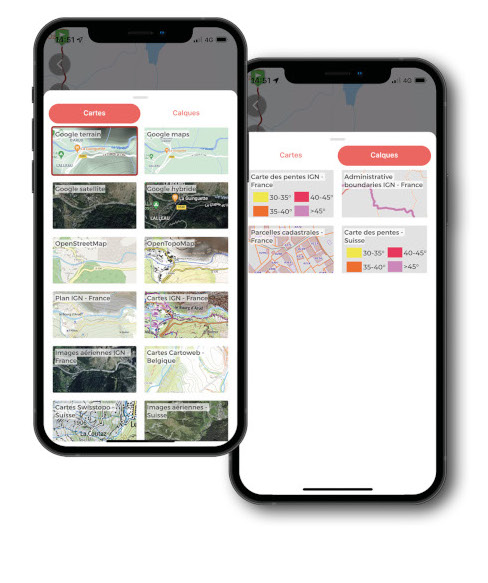
As soon as you're using a functionality of the app where you've got a map, you can change the layer of the map. Trail connect enable you to use 20 different layers !
By opening the layers gestion (button on the top left of the map which symbolize 2 overlaid diamonds), you can have access to a screen composed of 2 parts :
- basemaps : 16 layers available, with or without subscription
- overlays : you have the possibility to overlaid the layers with additional IGN layers (with subscription)
If you want to find a track easily, you have the possibility to pin it to the home screen. For that :
- In the search list, notice your track
- File your track on the left
- Click on pin the track on the home screen
- On home screen, your track appeared at the bottom of your screen
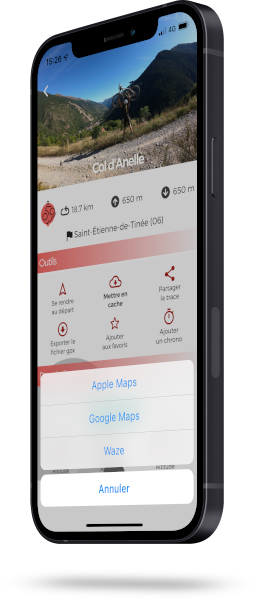
Trail Connect can help you to go to the start of your track. On the page of your track, in the information part and then, in the tools, click on go to the start.
The app will suggest you to open the guidance with the compatible application you've got in your mobile phone. (ex : Apple Maps, Google Maps, Waze...)
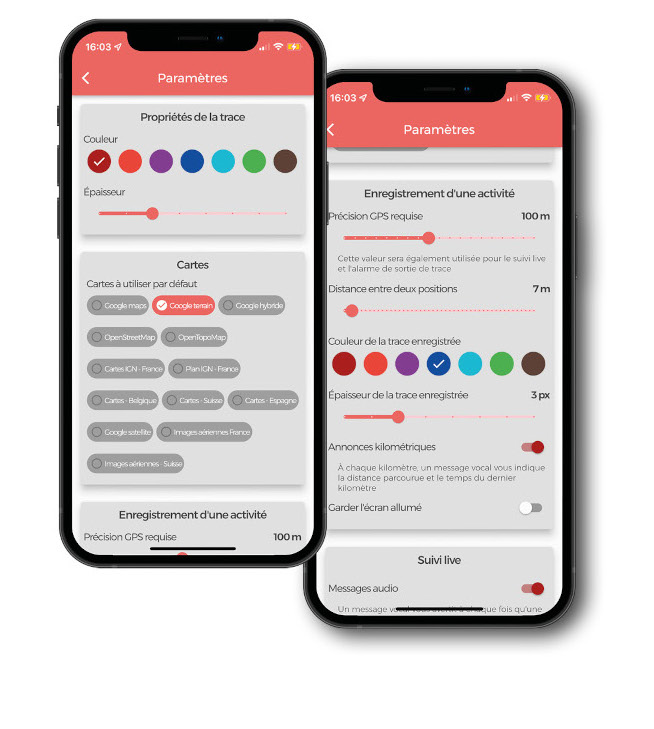
When you're recording an activity, the track is automatically drawn in a certain color and in a certain thickness. You can customize these 2 points, before or during your activity.
When you're in the home page, click on the menu on the top left, then on "parameters". You can then modify the indicators present in "recording an activity" :
- GPS precision : this value will be also be used for live tracking and monitoring alarm. By default, it's set to 100m.
- Distance between two positions : by default, it's set to 7m.
- The track color : by default, it's blue.
- The track thickness : by default, it's set to 3 pixels.
- The kilometric announcements : after each kilometer, a vocal message announce you the distance done and the time of the last kilometer.
- Keep screen on : if you tick this functionality, your screen will not be put on standby.
These parameters are going to customize the elements of your own activity.
You can also modify the color and thickness of a track you want to follow (what will appeared on the map). You can change these parameters in "track properties".
To use live tracking, distance to track alarm and the recording of an activity, you have to :
- activate GPS
- allow Trail Connect to always locate you, even when the app is not active and is in the background (you will find all the explications concerning GPS data on the top left menu)
- desactivate all the ways to save energy on your smartphone, otherwise Trail Connect will not be able to get the position of the smartphone in the background
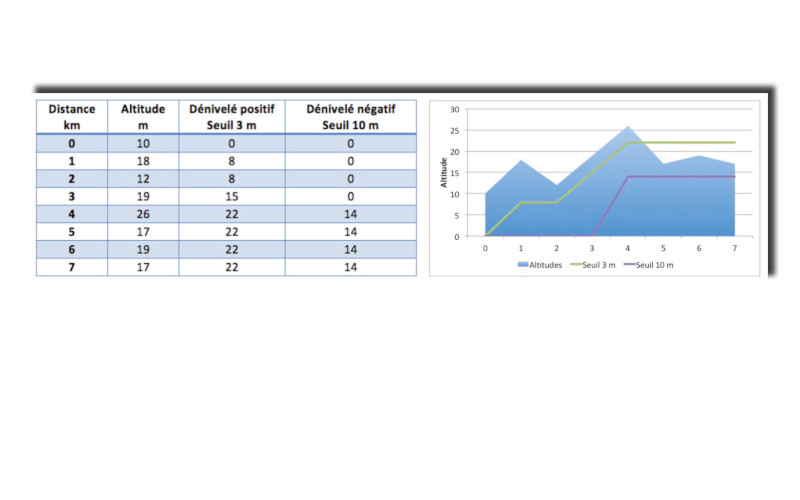
Depending on the geolocation of your activity, and of the type of the activity practiced, you will sometimes be required to modify the threshold of elevation gain. Go to the left menu, then on settings and you will be able to define the limit between 0 and 20m in the recording an activity part.
The threshold of elevation gain define the minimal distance of the altitude taken into account for the elevation gain calculation. It will delete the imperfections of altitude linked to the GPS. The board below will show you an example of the elevation gain raised, and of the elevation gain taken into account.
To delete a GPX files of Trail Connect app, go to GPX files in the Home Screen on the app. You can find here the list of the GPX files you have imported in the app. In oder to delete one, use your finger to slide the file on the left : something red appeared with a bin icon. Just free it to delete the GPX file permanently.
To follow a route on Trail Connect app, you just have to open the map of your route, and then to click on the location arrow (2nd button on the top left). You can then comparer your position with the initial track of your route.
To record a route and create your own track, go to map part on home screen.
- Click on the play button at the bottom on your screen to launch the recording of your activity
- Choose then if you want to activate live tracking and/or distance to track alarm (if you are on the page of a track). Don't forget to tick recording an activity.
- Click then on go ! and your recording will start
Once you start the recording, a red circle on the top right of the home screen of the app appeared in order to show you that is recording is in process.
It's utterly possible to save your activity without any existing track. You have to go to the home page, in the "map" functionality.
Once you arrived in the "map" functionality, you just have to click on the play button at the bottom of your screen to save your activity. You can chose to activate or not live tracking, but don't forget to activate the recording of the activity. Let's go !
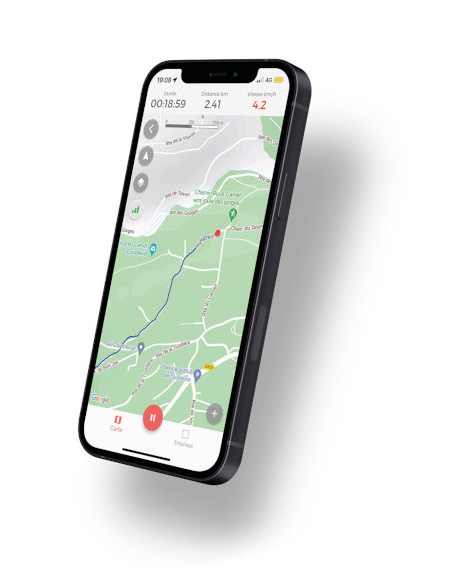
During your activity, several running data are available.
Once you've started the recording of your activity, you will discover a new screen. On this screen, you will find, in addition to the map and the track :
- the duration of your activity
- the distance you've done
- the current speed
- the altitude
- the positive elevation gain
- the negative elevation gain
After your activity, you will get access to other running data :
- elevation gain and elevation loss
- maximal and minimal elevation
- the pace in min / km
- the average speed in km / h
- the average speed km by km
You have the possibility to lock your phone during the recording of an activity but you have to authorize Trail Connect to "always" use the geolocation. (if you tick "use it when the application is active", it's not going to work when the phone will be locked).
You can locate yourself on the map without being on a track by clicking on the "map" mode on the home screen. The arrow on the bottom left of the screen will enable you to locate yourself at any time on the map. The arrow present on your location show you the North direction. You can so turn your mobile phone to guide you thanks to the layers, like a car GPS.
Tip : if you want to desactivate the automatic rotation of the maps, go to the parameters of the app (accessible from the lateral menu).
When you geolocate yourself on a layer, a position marker indicates the place where you are. A button with a target appeared at the bottom left of your screen :
- Target button selected in red (by default) : your position marker is always in the middle of the layer, even when you're moving. You can't navigate on the layer.
- Target button non selected in grey : your position marker appeared as well, but not imperatively in the middle of your screen. This possibility has to been used when you want to navigate freely on the layer.
So, select or not this button depending on your needs !
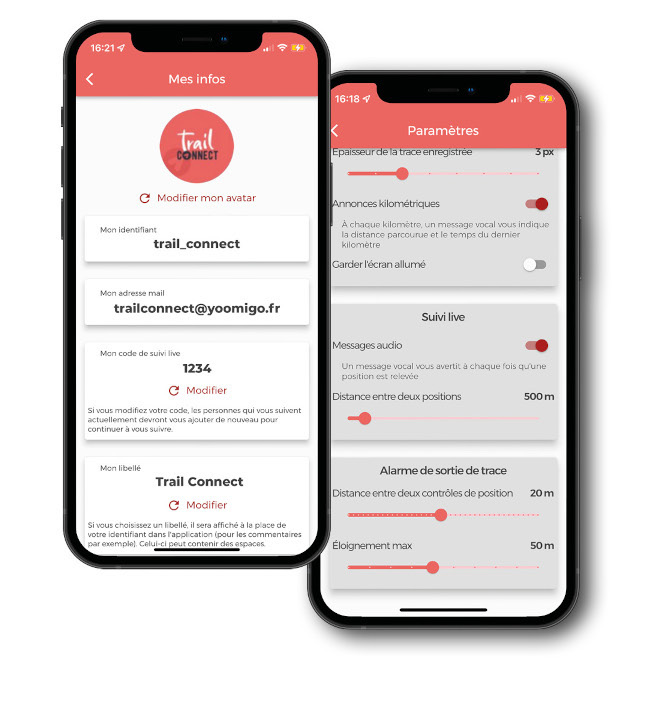
Your live tracking code appeared below your avatar in the top left menu.
Before you start, you can configure your live tacking code and share it. Click on the menu on the top left, then on "parameters" and then in the "live tracking" part, you can modify the following elements :
- modify your recording frequency (it's the distance as the crow files in meters between two position)
- the audio tracking (it warns you at every position found, and sent in case of available network connection)If you want to modify your live tracking code and customize it, click on the menu on the top left, then on "my information" and then go to "my live tracking code".
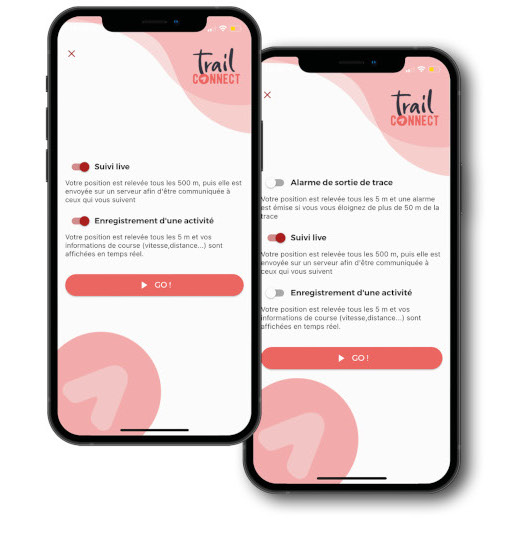
When you're recording an activity, you can activate the live tracking.
Whatever you are following a track or not, click on the play button which is at the bottom of your screen when you're on the map. Tick the "suivi live" and then click on "go!" : your live tracking is going ! If you want it to work, you don't necessarily have to tick the monitoring alarm and the recording of an activity : the 3 parameters are independent from each other.
Don't forget to customize before your start (ou during your activity if you want to modify it) the way your position will be sent. Click on the menu on the top left, then on "parameters" and then in the "live tracking" part, you can modify the following elements :
- modify your recording frequency (it's the distance as the crow files in meters between two position)
- the audio tracking (it warns you at every position found, and sent in case of available network connection)
To share your location with you friends, you will have to give them your live tracking code in addition to your user ID.
You can find your user ID and your live tracking code below your avatar, in the top left menu. You can customize these parameters in going to "my information" in this same menu.
Whatever your friends have got Trail Connect or not, they could follow you thanks to live tracking code and your user ID that you gave them. Then :
- If they've got Trail Connect app : on home screen, they have to click on "follow a friend" the, on the "+" on the top right. They could add you by adding your user ID or your mail address, and then your live tracking code.
- If they don't have Trail Connect app : they could follow you on your browser (mobile or computer) in going to Trace de Trail website. The following steps are the same.
The live tracking is entirely free for people who wanted to follow you.
- The live tracking on the app is free but required a user account (free registration too).
- The live tracking on Trace de Trail website is free and doesn't required a user account.
In order to allow people who are following you to see your progress on a route, you have to associate the live tracking with a route.
- On the app, when you're on the track you're going to follow, click on the play button and tick live tracking. People who are following you will see at the same time of the map your position and the route you're following. It will enable people to see on the same screen. your route as well as the initial track.
- On the contrary, if you are laughing the live tracking from the map (without a track), your positions will not be associated to an existing track.
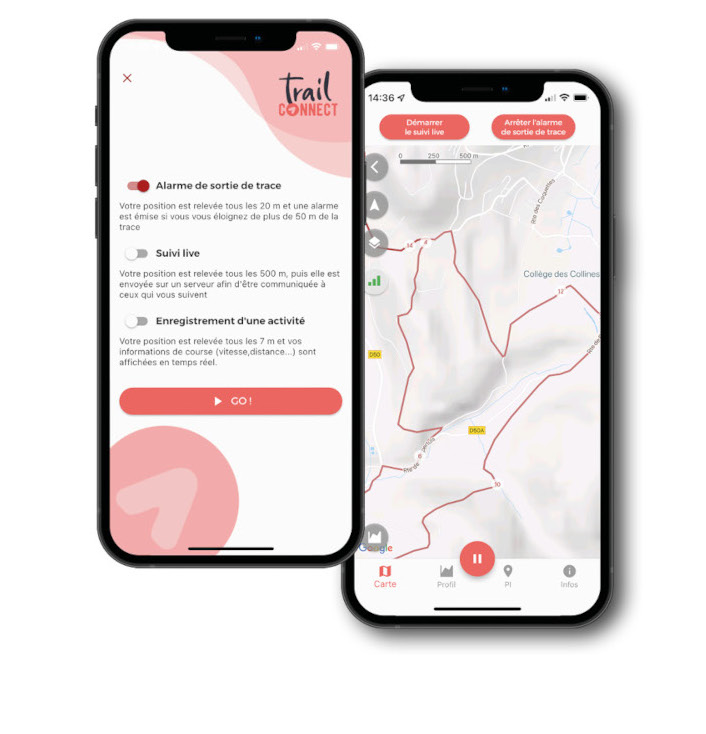
You can activate the distance to track alarm when you're not sure of the road you're taking and that you're going to need it.
You can activate it at the beginning of your activity or during your activity :
- If you want to activate the distance to track alarm for the start, click on the play button which is in the map of the track chosen. Tick "distance to track alarm" and you can start your activity !
- If you want to activate the monitoring alarm during your activity, start your recording as in the precedent stage but don't tick "distance to track alarm". Once your activity starts, you can find the button "start the track alarm" in the tools part in the top of your screen. Once the distance to track alarm is going, you can stop it at the same place thanks to the button "stop the distance to track alarm".
It's wise to activate it when you need it because this functionality use your mobile phone battery steeply, which will decrease the lifetime of the battery.
Before using the distance to track alarm, you can customize its working in order to make it equal to your need.
When you are on the home screen, click on the menu on the top left, then on "parameters". Go on to the "distance to track alarm" part where you will be able to configure :
- the frequency of control : the distance as the crow fill-in meters between two checks of your position. By default, this number is set to 20m.
- the maximum gap to route : beyond the distance between your position and the route followed, the alarm sounds. By default, this number is set to 50m.
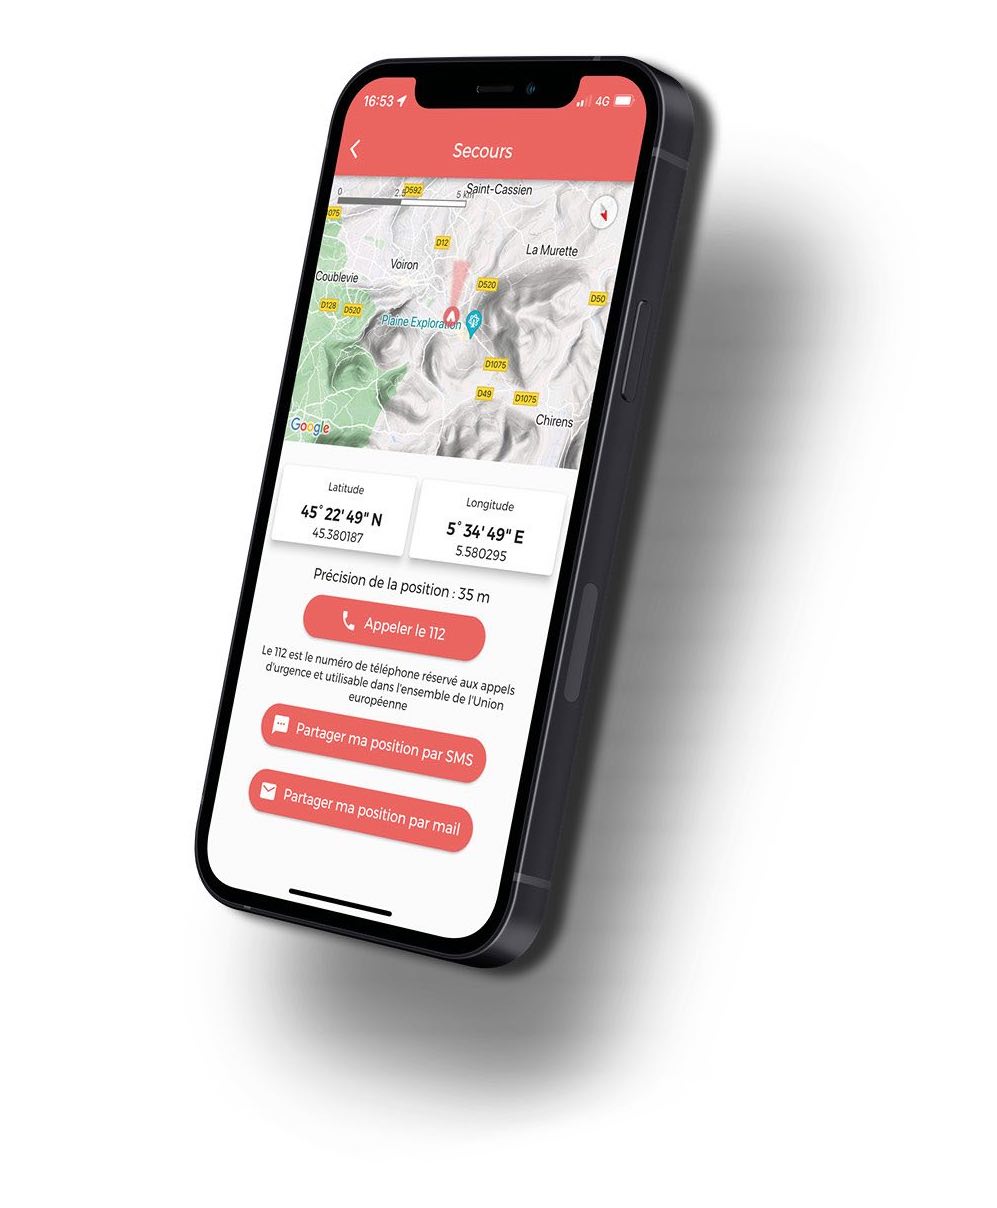
The rescue module enable you to let your relatives and the emergency services know that you're in trouble.
To use it, go back to the home page, then click on "emergency" on the bottom right. Your mobile phone will geolocate you, and will indicate the exact coordinates of the place you are, with the latitude and longitude. You can after :
- directly call 112 (emergency services)
- share your position by SMS
- share your position by email
How is 112 number working ? The 112 number is the number reserved to the emergency services, in France, in Europe (except Montenegro, Albania, Moldova, Belarus), as well as Switzerland, Iceland or Liechtenstein. It's a free number which need, to work, to be located in an area with at least one mobile operator, even if it's not your operation. The operators have in fact to enable the call, even is the SIM card doesn't belong to them.
You will be able to geolocate yourself at any time without network connexion.
In oder to call the 112, you have to get at least the connexion of one operator.
If you want to send a SMS or call your relatives, you will need to get the connexion of at least one operator. The sending of a message doesn't need a huge network connexion.
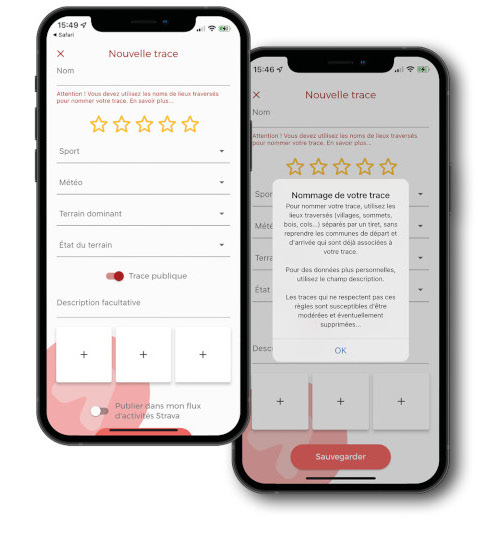
Once you've recorded your activity, you can click on pause button at the bottom of your screen, then a second time to stop the recording. You have the possibility to :
- post my time : if you followed an already existing track
- create a new track : if you made the recording of a new track
An input mask is opening. Complete the different fields.
Be careful : pay attention to respect the naming rules of Trail Connect. Use the name of the main places you went separated by a dash, without writing the name of the start and arrival place.
Don't panic ! If you did a mistake during the recording of your activity, or if you simply want to change something the parameters, you can modify your route thanks to your Trace de Trail account (same username as Trail Connect). You have then to go to your track, then to click on the little pencil on the top left, and you can now modify the parameters wanted. Dont' forget to save your changings !
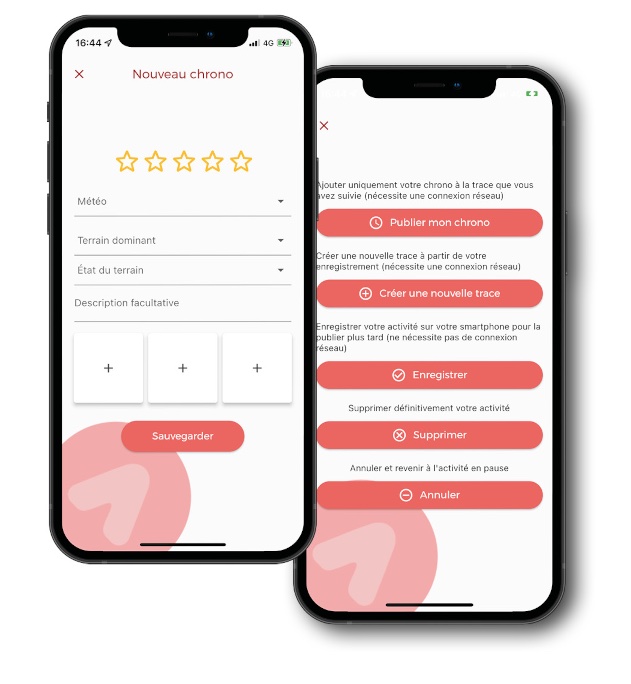
If you followed an existing track of another user, you can share your experience and time on that track instead of creating another one.
Once your activity is done, you can click on the circle in the bottom of your screen. Your activity is paused. You can click a second time on it, and then click on "stop" if it's your choice. To share and experience on an existing track, click "publish my time".
An input mask is opening. Complete the fields.
Then click on "save" : your time will be added to the existing track !
Once you've recorded your activity, you can click on the pause button at the bottom of your screen, and a second time to stop it. If you want to save your activity on your mobile phone, because neither you want to create a new track or to share your experience, nor you have a network connexion, you can click on "save" in order to save your activity on your mobile phone to publish it later.
Be careful : your activity is saved on your mobile phone, not on your Trail Connect account. If you uninstall Trail Connect and install it again, or if you change or lose your mobile phone, you will lose your activity.

In order to share your activity to Strava, you have to associate previously both accounts.
On home screen, click on the menu on the top left, then on "Strava account". Then click on "connect to Strava" and follow the steps. You will have to go back to this screen if you want, one day, to disconnect with Strava.
When you will have finished your activity, you can publish it on Strava, whatever you want to share your experience and time or you want to create a new track. Click on one of these two possibilities, and you will find at the bottom of the screen "post on my Strava feed". The activity is on Strava once you've finished the recording of your activity in Trail Connect.
Be careful : if you want to post it on Strava, you have to do it during this stage. It will no longer be possible after to modify the activity and to chose to publish it on Strava.
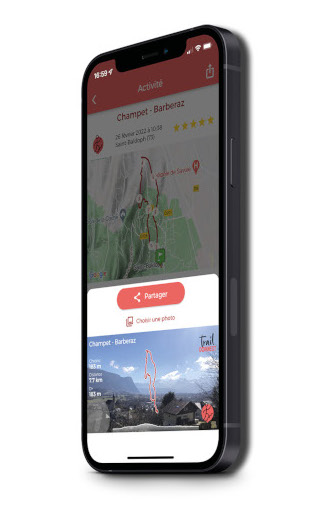
Once you've published your activity, you can find it in your dashboard (that you can find on home screen).
- Click on the activity you want to share, then on the sharing button on the top right. A screen on the bottom of your screen appeared.
- You can add a photo (optional) which will be on the background of your track.
- Click on "share" on the top right and chose your way of sharing : directly to your relatives or on social media !
Trail Connect app has a free version to enable its use to the majority. You can search routes, consult tracks and geolocate at anytime on the map (with network connexion) freely.
But if you want to benefit to all the functionalities with for exemple the downloading of layers for an access without network connexion, the recording of an activity, the live tracking module, the track alarm... you will need to subscribe.
On Trail Connect app, you have the possibility to get a subscription to enjoy all Trail Connect's functionalities.
Discover them in details in the subscriptions page.
If you decide to get a Trail Connect subscription, you will have several additional functionalities as well as on the app but also on Trace de Trail website. With a subscription, you will have the possibility to :
- Download the layers before your activity for a use without network : it's going to enable you to have access to the layers, in addition to your track if you download it, in order to anticipate the lack of network
- Use track alarm : when you're following a track, this functionality will enable you to be informed if you move away from the track
- Record your activity and your data
- Enjoy live tracking to keep linked with your friends during your activities
If you want to try Trailer+ and/or live tracking, you can contact us by mail in oder to activate a trial period : admin@tracedetrail.fr
The souscription of Trailer+ (with or without maps) in addition to live tracking (available as well by month) are available for a year. You get an automatically renewal but you can stop it at any time if you wish.
You don't need a user account to consult the functionalities of the app. You are not forced to create one after its installation.
However you will need to create one to use the functionalities of the app, with or without subscription. The creation of an account is fast and easily, and doesn't engage yourself in anything.
Outdoorvision is a service proposed by the Pôle ressources national sports de nature (support mission of the Ministry of Sports) to accompany the regional authority in paths gestion. The objective of the project is to collect the gpx tracks of outdoor sports in France in order to facilitate the decisions of municipalities in the development of outdoor sport itineraries.
Trail Connect become partner of Outdoorvision project since 2022. We suggest you to share the tracks you've recorded with the app.
How it works ? Once you record a route, we suggest you to share automatically the track with Outdoorvision. You have the possibility to untick the sharing if you don't want. If you accept to share your itinerary, your track will be sent in an anonymous way to Outdoorvision platform. Outdoorvision is not able to make any link with your Trail Connect account.

If you forgot your password, write your mail or your user ID on the connexion link, and then click on forgotten password. You will receive an email with a link with will enable you to reset your password.
If you want to change your password even if you didn't forget it, vous can do the same thing. But you have first to disconnect by going to the top left menu, and clicking on disconnection.
Your Trail Connect user account is shared by all the tools provided by Yoomigo company : Trace de Trail website, Trail Connect app and Espaces Trail website. The deletion of your user account is non reversible and all the elements that you've created on these tools with this account will no longer be accessible (routes, comments, times...).
If you still want to delete your user account, you can do it directly on the app, in the left menu, in my infos and then on delete my account.

 Trail Connect